I've moved! You can now find this blog at www.teachingthelittlepeople.com. Please bookmark this new site and come on over!

Sunday, April 15, 2012

Pets in Preschool

Teacher's Notebook
Teachers Pay Teachers

This week at school our theme was pets.  Of course, it was only a four-day week as we had Monday off after Easter.  Plus, it was a very unusual week because it rained and kept us inside for three of the four days.  The especially put a damper on our plans to have several well-behaved pets of class member visit (since we had to hold our pet visits outside).  However, we made the most of the time we had by doing all sorts of fun pet things.

We did a lot of graphing about our pets - which I'll show you tomorrow.

We also pulled out all of our plastic cats and dogs and other pets to count and sort and play with.  The second day of the week we put the dogs and cats with the playdough, and the Little People loved this.

That's the fun thing about playdough.  It holds substantial learning possibilities all on its own in the sensory department.  Then you can add any kind of themed manipulatives and the fun and learning increases.

The Little People made cat and dog "islands", with all the animals hanging out in groups.  They shaped dog and cat beds.  Then after I added some toothpicks they installed some "fences" around the animals.

It was playdough fun for one and all, and a great way to make the most of Pet Week.

Sunday, April 8, 2012

Shape Bugs in Preschool

Before we left school for Spring Break, we spent a lot of time talking about things that start with the Letter B.  One reason for this is that  B was the letter that we were talking about.  The other reason for this is that this time of the year just lends itself to "B" things:  Bugs, Butterflies, Bunnies, and Baskets.

When talking about bugs, we did a lot of talking about how many body parts and legs bugs have, and how they're different from spiders and other non-bugs.   We tried our best to catch some bugs on the playground, but alas, we could not find any.

We did, however, make Shape Bugs.  I set out a bunch of different paper shapes, along with some glue, paper reinforcement stickers, sticky dots and markers.  I also accordion-folded some paper strips for legs.   When I introduced the center I talked to them about bugs having three body parts and six legs, but any number of eyes.  Then I let them at it.

When we were done, we had some wonderful bugs:


I love it when the Little People combine their own designs with the things that they're learning.  The result is the perfect mix of creativity and knowledge.

Friday, April 6, 2012

Painting Flowers with Household Objects


Not long ago we were talking about Spring at school and decided to do some flower painting.  I saw this flower painting idea on Pinterest from Deborah at Teaching Preschool:

Source: teachpreschool.org via Laura on Pinterest
I especially loved how the flower-making process had two steps:  the stem-gluing and the flower-painting.

So following her example I decided to give it a try.

We set out the paper, stems, paint and pot scrubbers.  After the kids glued their stems on the paper, they moved over to the painting table.  I decided to add something to the scrubbers to make them easier to hold, and after wandering around the Dollar Tree for awhile I found just what I needed: hair clips. They made very good "grabbers" (as the kids called them), although I should have rubber banded them closed so they didn't get opened up by mistake during all the enthusiastic painting.

We also used something else that I found at the Dollar Tree for our flowers:


They're actually sponges meant for car washing.  However, when dipped in paint they made the most wonderful hyacinths.


Of course, some of the Little People did more rubbing and smearing with the painting objects than flower printing.  However, this was okay, and they all turned out beautifully.

One of the best things about the car wash scrubbers is that they can be removed from their plastic handles and thrown in the washer.  Which is my favorite kind of painting tool.

But wait...that's not all.  As I was reassembling them after washing for these pictures, I noticed that the scrubbers are actually one long scrubbing piece that have been stitched together at one end to make a U-shaped scrubber:


I began wondering what would happen if I took out these stitches, so I took my utility knife and cut all of these little threads.  Kind of like car-washer-sponge surgery.


When I was done - voila!  I had one long fuzzy piece, which I think would be perfect for printing fuzzy caterpillars:


You could even use the fabric pocket on the back to put a heavy wire (like a bent wire hanger) or a plastic pipe through to make holding it easier.


Or you could use if for a puppet, I suppose.  Give it some wiggly eyes, and it would be ready to go.

That's my Friday Find for today.  Several fun options for one dollar - and washable, besides.

Wednesday, April 4, 2012

Box Sculptures in Preschool

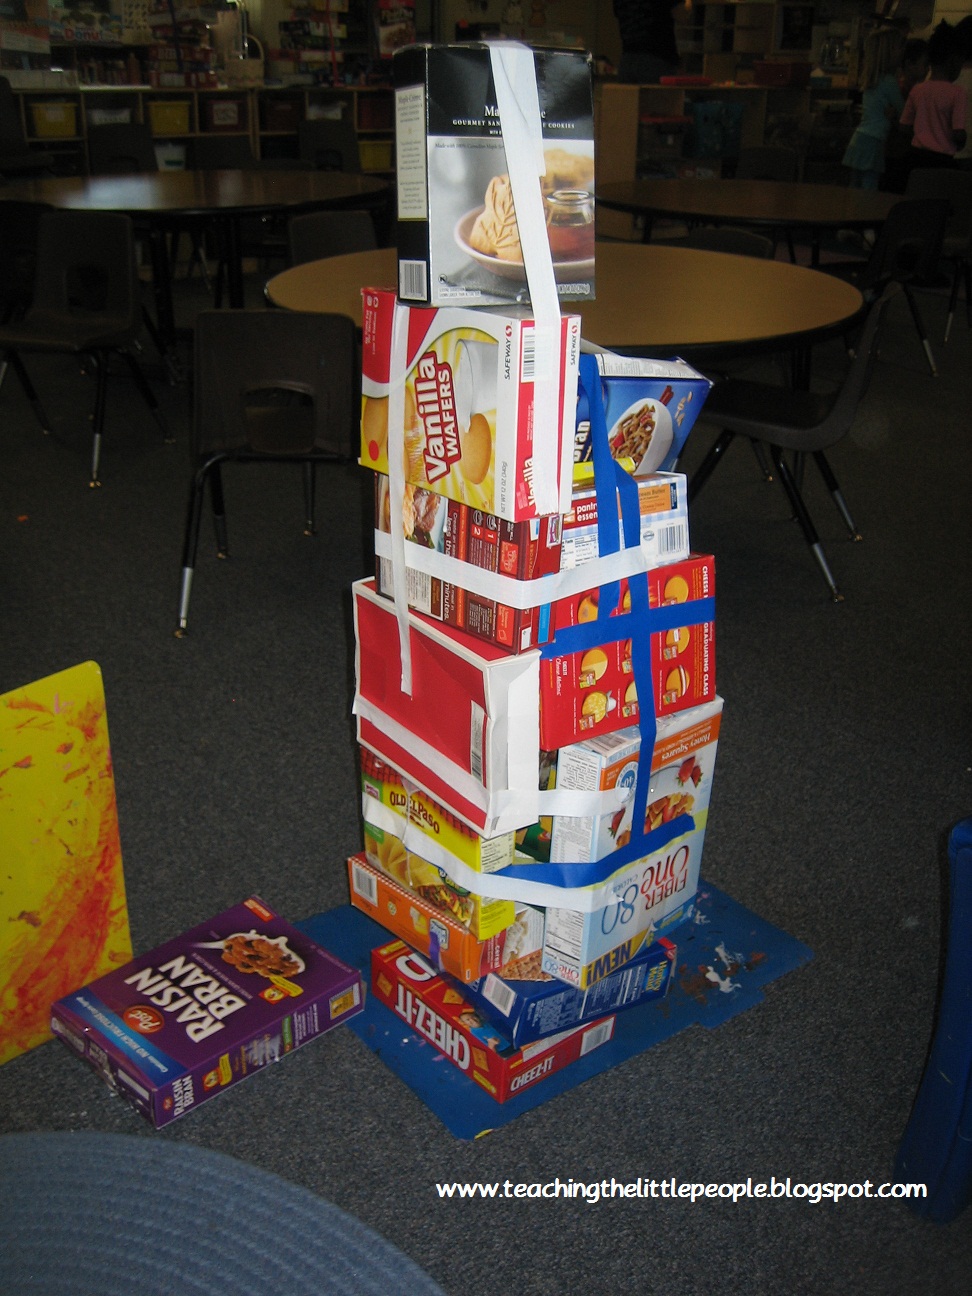
As I mentioned a week or so ago, this past week we made box sculptures at school.  I had been collecting household boxes all school year long, so I had a quite a collection.  In fact, every time over the past seven months that I found one of these boxes in the recycling bin I would fuss at the family.  "'B' is for Box", I scolded, and put the box in the garage.  Eventually I starting flattening them and storing them up in garage/loft above the cars.

Although actually, we didn't use them during Letter B week.  I decided to move them to Letter X, since activities for that letter are pretty few and far between.

So last week I asked bribed my sons to "reconstitute" them with packing tape and then I piled them in the car.

Here's how they looked on the all piled in and ready to roll:


I ended up with over 200 boxes (which I suppose tells a lot about how much packaged food our family eats).  Here some of them in the classroom waiting to be used:


As you might imagine, the kids had a great time gluing their boxes together.

Some just wanted to make their sculptures as tall as possible.  To enable this, we ended up using a lot of our favorite colored masking tape to hold them together while they dried:


Some were happy to spread their sculptures out and build several towers beside each other - kind of like a city block in box form:


 On Day Two we had several people make Robots:


Here are several of the sculptures waiting to dry and be taken home:

One of my favorite parts of the project was the parents' expression when I opened the classroom doors at the end of the day and carried out the sculptures.  To their credit, no one fussed or even looked negative about taking home such bulky items made out of recycling objects.

I will definitely do this activity again, but next year I will not make them so close to Spring Break.  As it was, we made them the two days before the break and I didn't want to leave them in the room until we returned.  That way if we made them another week, we could come back to them when they were dry and paint them. Now, that would be fun.

I will also try to collect more smaller boxes.  This will allow them to build higher sculptures without adding so much bulk to the top.

One advantage to this project being finished is clearing out the multitude of boxes that have been living in our garage all school year long.  The disadvantage is that I am now completely stymied when I empty out a box. Do I put it in the recycling bin, or start saving again?  I just don't know.

But we certainly had a good time with the boxes that I just passed on to Little People.

Monday, April 2, 2012

Pinterest Project Tryout: Pool Noodle Blocks


Ah, Pinterest.  In my opinion, there is no better place to find new ideas for the Little People.  I have tried many of these ideas this year, and have found some really fun new activities.

A few weeks ago I decided to try this idea that I had pinned earlier:
Source: toddlerboredombusters.blogspot.com via Julie on Pinterest
It comes from this original post: Toddler Boredom Busters: Noodle Building!.  The idea is to cut pool noodles into pieces and let the students use them as building blocks, with toothpicks being the connectors.

After a trip to Walmart to pick up the pool noodles, I cut them all up in my kitchen (after a small Cheez-It snack and a quick Windex cleaning bout).  I used a bread knife to cut them, which worked well.  It did leave a little colorful noodle dust on the counter, but that was easy to clean up.


 Then I carted them off to school and put them out with lots of toothpicks.  It didn't take long at all for the Little People to start building...


and building...


...and building.

Actually, they got a little distracted at first by their desire to be enterprising.  They began gathering all of the noodle pieces that were cut into rings and sticking one toothpick in each of them them to make "ice creams".  Then they starting walking around "selling" these goods to one and all.   However, I had to nip that action in the bud, because toothpicks are really quite sharp, and I didn't need any Little People falling on them and poking themselves.

The good thing about this restriction is that once they had to stay at the table, they spent less time vending and more time building.  They really made some very creative things:


We had these Noodle Blocks out for a week, and the kids stayed engaged with them the whole time.  In fact, I'll probably put them out again before the end of the year.

In closing, here is a quick review of this project and how it worked for the Little People:


Sunday, April 1, 2012

14 Ways to Create Learning Experiences for Children with Plastic Tablecloths


From my experiences from teaching Little People, I have gleaned several basic Facts of LittlePeoplehood.  One of them is Little People + Dowels = Poking, and who needs poking?

 Another is Crepe Paper (or Tissue Paper) + Water = Big Mess.  As much as I love the wide availability and low cost of both of these materials, I don't like it when our projects made with these materials fade and "melt" when they get wet.

While pondering new and better materials to use for a recent project that called for tissue/crepe paper, I suddenly thought of plastic tablecloths.


For just a dollar at the dollar store (and just a little more elsewhere), you can buy 54" x 108" of this material in a whole rainbow of colors.  They are easy to cut, easy to manipulate and easy to replace.


Since this revelation,  I have used plastic tablecloths to make several different projects with the Little People, and all things considered, I think they are wonderful.

There are a few things you need to know about using them, however:

1)They are very easy to cut.  You can use scissors, although my favorite method is to use my paper cutter.  You can easily fold the whole table cloth up into a few folds and easily cut a whole bunch at one time.


However, when you cut many layers at once, the cutting tends to "seal" the layers together.  For example, the strips below that look like big, thick single strands are actually five or six layers with the edge pressed/sealed together.

 I have found that the best way to separate the layers is to rub the combined edges of the layers against something rough, such as the carpet, or even a scratchy cleaning sponge.   This will separate the layers enough to begin pulling them apart.

2) Another thing you need to know is that the strips of plastic are easy to tape onto objects with regular masking tape. To make streamers or fringe for a project, I will usually wrap masking tape sticky-side-up around something and just place the streamers where I want them.  Then I pull off the tape and put in on the desired place.


However, if you aren't careful, any loose edges will also adhere to the masking tape.  And while they stick very easily to the tape, it's not as easy to get them off.   In fact, if you try to pull them off, they usually will just stretch and break.  The answer I have found to this is to align the plastic pieces on the tape just before you tape them onto your object.  Definitely do not align them at home, and then say, drive them around in the backseat of your car tumbled up with many other preschool objects.  Because then they will look like the picture below, which is a complete unfixable mess:


Also, you definitely want to use tapes and regular glues to adhere the strips to your project, and not hot glue.  As I'm sure you already know, hot glue melts plastic, and will leave your wonderful streamers un-adhered and basically just melted down into globs.  Colorful globs, but globs nonetheless.

3) While the strips are very thin and move wonderfully in the wind, they also tend to stretch and break when pulled on.  However, so do tissue and crepe paper (well, they don't stretch so much, but they do break).  And, as with tissue and crepe paper, the plastic tablecloth material is cheap and easy to replace.  Plus, it doesn't bleed, doesn't fade as quickly in the sun, and is just fun and pretty to work with.

Now that you have some hints and suggestions about working with plastic tablecloths, here are some things you can make with it: